Deploy to Application Container Cloud Service from Oracle Storage Cloud via REST API

As mentioned in my previous post about Application container cloud. We can use two options to upload application archive to ACSS

  • UI console (Already covered in previous post)
  • From Stroge cloud service via REST API

In this post, we will talk about upload archive via storage cloud Service using REST API. There is two steps for that

  1. Store archive to Storage Cloud service.
  2. Deploy Archive to ACCS.

tttttt

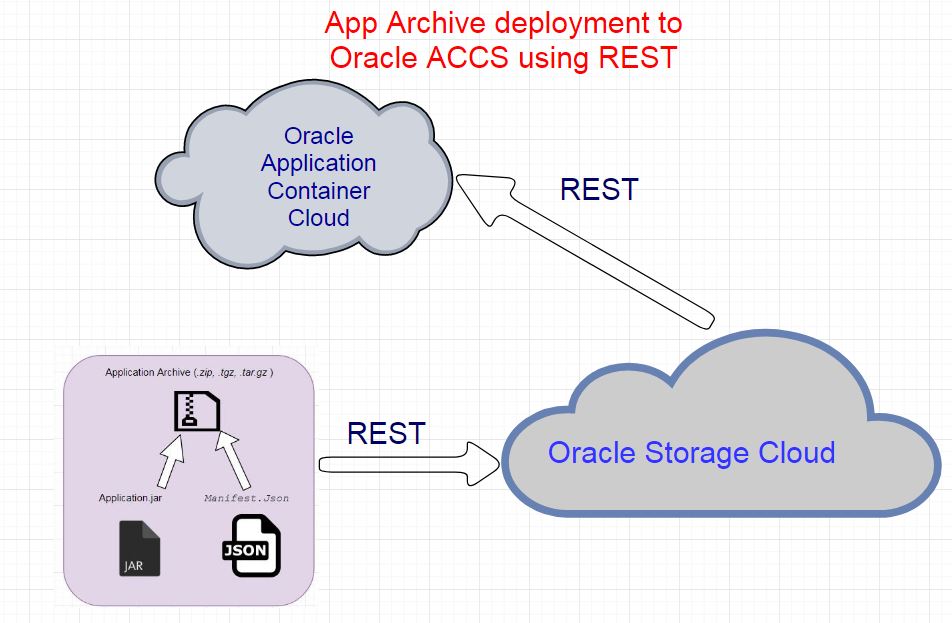
Information credentials for cloud account should be handy as identity, domain, password for using in REST API. Using cURL scripts to upload your application to the storage service.


Note :  cURL is a tool to transfer data from or to a server, using one of the supported protocols (DICT, FILE, FTP, FTPS, GOPHER, HTTP, HTTPS, IMAP, IMAPS, LDAP, LDAPS, POP3, POP3S, RTMP, RTSP, SCP, SFTP, SMB, SMBS, SMTP, SMTPS, TELNET and TFTP.


Store archive to Storage Cloud service


Before uploading in Storage cloud, We need to build container in Storage Cloud Service. Either you can via Storage cloud UI console. Building using UI console is pretty easy and straightforward.


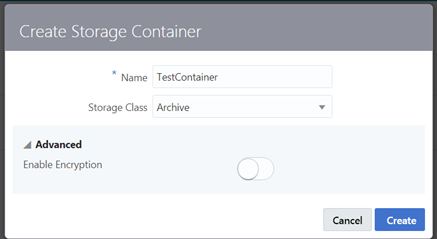
We will create container via curl command.

  1. Below Script will create storage container.    
# CREATE STORAGE CONTAINER
curl -i -X PUT \ -u User-Name:Password \ https://hostname/v1/Storage-Identity-Domain/App-Name


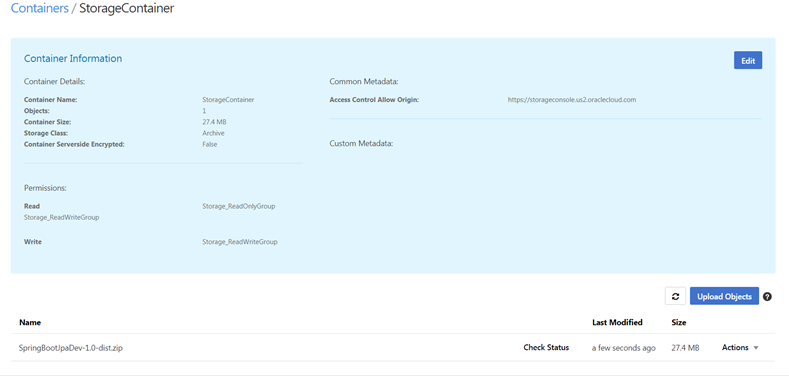
  1. Now upload your application archive to the storage container.
# PUT ARCHIVE IN STORAGE CONTAINER
curl -i -X PUT \-u User-Name:Password \ https://hostname/v1/Storage-Identity-Domain/App-Name/Archive-File-Name -T Path-to-local-file/Archive-File-Name

For example use following script to upload it

curl -i -X PUT \ -u sampleUserName:samplePassword \ https://storage.oraclecloud.com/v1/Storagecontainer/DeveloperSkillsApp/SpringBootJpaDev-1.0-dist.zip -T target/SpringBootJpaDev-1.0-dist.zip

After running these script, it is uploaded to Storage cloud container.


Deploy Archive to ACCS –

After uploading archive to Storage cloud servicee, ACC’s deployment procedure can be invoked. We need to provide standard set of information while deploying. Sample schema of script should be as follows

# Mock Deployment Script
url -i -X POST  \
  -u User-Name:Password \
  -H "X-ID-TENANT-NAME:Identity-Domain" \
  -H "Content-Type: multipart/form-data" \
  -F "name=App-Name" \
  -F "runtime=java" \
  -F "subscription=Monthly" \
  -F "[email protected]" \
  -F "archiveURL=App-name/Archive-File-Name" \
  -F "notes=Your Notes here" \
  https://hostname/paas/service/apaas/api/v1.1/apps/Identity-Domain

Trying to upload with following script –

curl -v -u "USERNAME:PASSWORD” -X POST -H "X-ID-TENANT-NAME: IDENTITY_DOMAIN" -H "Content-Type: multipart/form-data" -F "name=Developer-skills-service" -F "runtime=java" -F "subscription=Monthly" -F "archiveURL= Storagecontainer/SpringBootJpaDev-1.0-dist.zip " -F "notes=Developer Skills Service Deployment" https://apaas.REGION.oraclecloud.com/paas/service/apaas/api/v1.1/apps/IDENTITY_DOMAIN


When you deploy your application, you can reference a deployment.json file. Information about deployment like memory , instances etc. can be pass via deployment.json.


You can automate these two process using maven. You can also configured this by maven plugin in Oracle Developer cloud services.


That’s all for now. Happy Oracle Cloud learning.

Deploy ADF application as shared library in weblogic

Shared library – WebLogic Shared Library is an Enterprise Application Archive, a stand-alone EJB, a Web Application module, or a JAR file that is registered with Oracle WebLogic Server as a shared library. The library resources can be shared between multiple applications, alleviating the need to have duplicate copies of the resources in each application. For an example, we can all dependency as shared libraries in weblogic.

Normally in bigger application, best practice is to use common features application or dependency as shared library in weblogic. For example, taking an webcenter portal application
we are making custom taskflow and using it in webcenter portal application. We can deploy these adf taskflow as shared libraries and can reference in weblogic.xml for Portal application.

We have two option.
– Deploy adf app as jar and then deploy as shared library or wrap jar into war profile and deploy as shared library.
– We can directly deploy adf application as war shared lib in Weblogic.

Following is the process for ADF/ Webcenter Application in jdeveloper

1) Create deployment profile as war file.
2) Create an MANIFEST.MF file as META-INF/MANIFEST.MF

Manifest-Version: 1.0
Implementation-Title: ADF_Shared_Lib
Implementation-Version: 1.0
Specification-Title: ADF_Shared_Lib
Specification-Version: 1.0
Extension-Name: ADF_Shared_Lib

3) Edit war deployment profile and add MANIFEST.MF in war options.

555

4) Deploy ADF taskflow to weblogic(assuming you have made connection with weblogic in jdeveloper) to specific managed server or admin server.
5) mark option as deploy as shared library instead of application.

11

222

444

6) In master (Portal) application enter reference of your shared library as follows

ADF_Shared_Lib 1.0
1.0
true

This way you can directly deploy from the jdeveloper. Other options is to deploy as war file and find war file from specified location and go to weblogic admin console
and install as shared library

11111

Note: If you deploying shared library again, make sure, you increase implementation version every time to specify version no.

Video –

Troubleshoot :

IOException: ‘Invalid header field; with manifest
Solution – Make sure name is name is correct. There is proper spacing after colon in manifest file content.

Unresolved WebApp library references defined in weblogic.xml
Solution- Make sure you have same implementation version and specification version of shared library, If there is mismatch you will get this error.

Till then happy deployment in Weblogic with Vinay…..

Deploy Custom ADF Application to WebCenter Spaces

Requirement- How to deploy custom ADF task flow to Webcenter spaces

Solutions-You can extend or alter the look and feel and functionality of Oracle WebCenter Spaces task flows using the Oracle JDeveloper Customization Developer role. If you want to build custom task flow application to spaces.If you want 100% customization then you can use custom task flow.see this Portal vs Spaces. When you want to deploy 100% task flow, its bit trickt.Please follow the steps

Steps-

ADF application with custom task flow-

-> Create a new deployment profile (“ADF Library JAR file”) for the View Controller project
-> Delete the existing WAR deployment profile from View Controller -> Project Properties
-> Deploy the View Controller to ADF Library JAR (Right Click on ViewController -> Deploy)
-> Note the location of the JAR file

Create a wrapper project which will be deployed as WAR file and will include the taskflow JAR file

-> Create a new Generic Project
-> Create a WAR deployment Profile
-> Add task flow JAR file to WAR deployment.
-> Right click on the new project -> Project Properties
-> Select library and classpath
. Click ‘Add JAR/directory’
. Add the JAR created in step (4)
-> Edit web.xml for the wrapper project and remove all entries
. Note: FAILURE to do this will result in errors
-> Deploy the Wrapper project to Webcenter spaces (Right Click wrapper project -> Deploy)
. Create connection to Server
. Select WC_Spaces Managed Server
. Ensure to select radio button “Deploy as shared library”
. After Deployment, Ensure Library is displayed by logging into the WLS Console (Admin server)
Extend Spaces and reference the library that contains the custom task flow
1. Download and install Oracle JDeveloper WebCenter Framework and Services Design Time Extensions:
. In JDeveloper, select Help > Check for Updates.
. Click Next, and then Next again to display all available updates.
. Use the search field to filter the list, for example, enter ‘webcenter framework’.
. Select WebCenter Framework and Services Design Time.
. Click Finish.
2. Download the WebCenter Spaces development ZIP file (DesignWebCenterSpaces_ps4.zip) from Oracle Technology Network:
http://download.oracle.com/otndocs/tech/webcenter/files/DesignWebCenterSpaces_ps4.zip
3. Copy WebCenter’s WLST (WebLogic Scripting Tool) commands to the Oracle home directory where JDeveloper is installed:
. Navigate to \copy_to_common
. Make a copy of the common directory.
. The common directory is located under \copy_to_common.
. Navigate to: \oracle_common
. Copy the content of the common directory here.
. Copy new version of oracle.webcenter.portal.jar to the Oracle JDeveloper extensions directory:
a. Navigate to \copy_to_jdev_ext
b. Make a copy of oracle.webcenter.portal.jar.
c. The oracle.webcenter.portal.jar file is located under
\copy_to_jdev_ext.
d. Navigate to: \jdeveloper\jdev\extensions\
e. Copy the oracle.webcenter.portal.jar file here.
4. Restart JDeveloper if it is open.
5. Edit weblogic.xml and add your library
6. Modify the config.properties files

Before you can build the shared library list and deploy extend.spaces.webapp.war to the WebCenter Spaces managed server, you must provide some information about your environment and your WebCenter Spaces installation in the configuration file config.properties

. To set build and deployment properties for the extend.spaces.webapp shared library
. Open DesignWebCenterSpaces.jws.
. Expand the WebCenterSpacesExtensionLibrary project.
. Open config.properties.
. Enter information about your JDeveloper environment and WebCenter Spaces installation, as shown in
. The config.properties file describes each property and offers examples. The defaults provided are only samples and must be replaced with your own, installation-specific values.
7. Save your updates to config.properties
8. Select WebCenterSpacesExtensionLibrary project and deploy to WC_Spaces using ANT
. Clean stage
. Deploy-shared-lib
. After Deployment, Ensure Library is displayed in WLS Console

Register the taskflow in Resource Catalog
1. Login to Webcenter spaces
2. Click on ‘Administration’
3. Create a new catalog and copy it from the default catalog
4. Select the newly created catalog and click on ‘Edit’ -> ‘Edit’
5. In the ‘Edit’ popup, select Add -> Add from library
6. In the search box, enter the name of your taskflow
7. Select your taskflow and give it a ‘Name’ and click ‘Add’. This adds the taskflow to the resource catalog
8. Select the newly created catalog and click Edit -> show
9. Click on ‘Configuratiions’ tab
10. Change the ‘Resource Catalog for Home spaces’ to the newly created catalog and click ‘Apply’
11. Now go back to webcenter spaces and to test the newly created taskflow:
. Create a new page
. Click on ‘Add Content’
. Select the taskflow from the catalog and click ‘Add’. The taskflow should
appear on the page
. Click ‘Save’ and ‘Close’