Handle JSON message in pipeline using javascript in OSB12c

Oracle Service Bus 12c provide the feature to handle JSON messages inside pipeline, although this feature was not there in first version of 12c but later version provides full JSON support. In this post, I will show how to handle JSON message inside pipeline. JavaScript is new action introduced inside message flow that help us to read/write and manipulate JSON messages.
Let’s start with this sample. I will show how to read below JSON message inside pipeline using JavaScript action and how to generate below JSON response using JavaScript action.
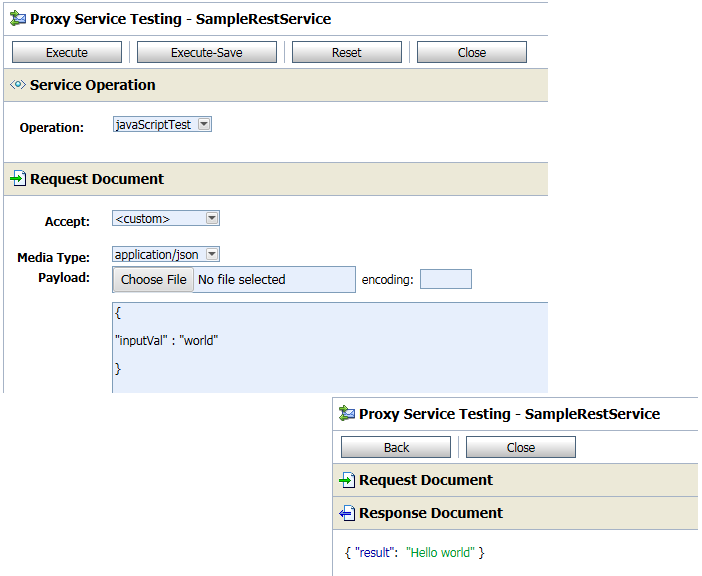
Request JSON
{ “inputVal” : “world” }
Response JSON
{ “result”:  “Hello world” }

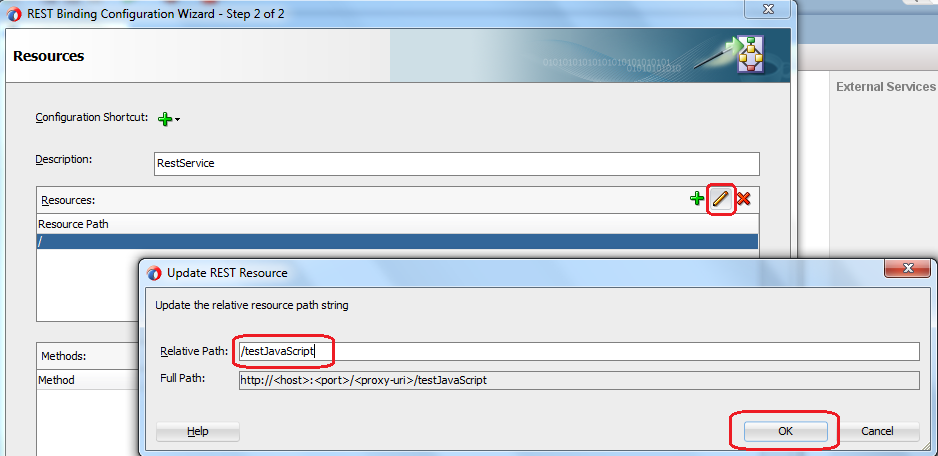
First of all, create new OSB project under OSB application. Now create Rest proxy service that accept JSON message and send JSON as response, to do that right click and choose “REST” option and provide proxy name. In next screen you need to provide resource path for this rest proxy.

OSB 12c JavaScript Action Create Proxy
OSB 12c JavaScript Action Proxy Resource Path

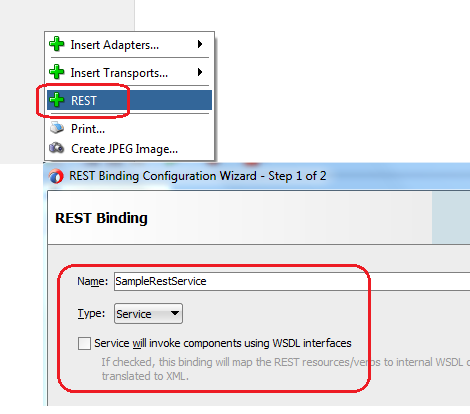
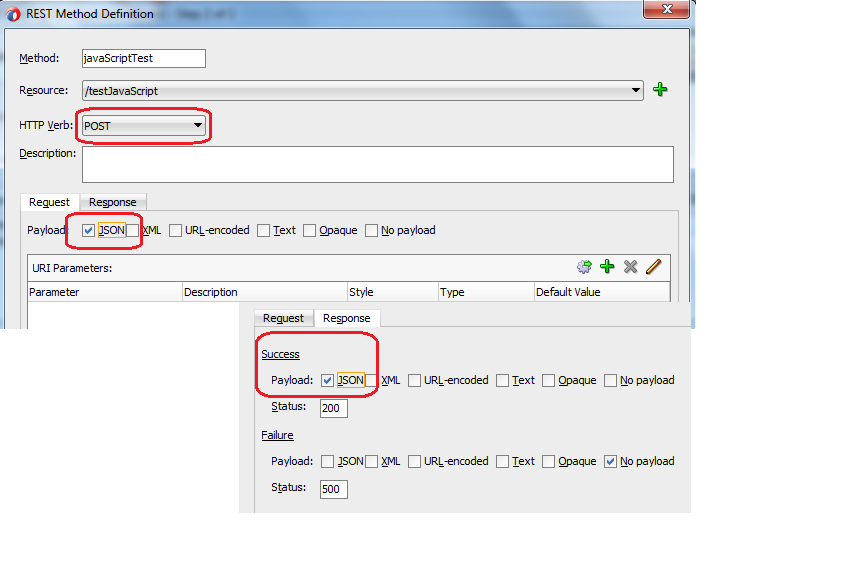
Now click on “Add a new Rest Method” option. Provide method name in next screen and choose “POST: method. Also choose “JSON” option for both request and response as we are dealing with JSON message here.

OSB 12c JavaScript Action Proxy add rest method
OSB 12c JavaScript Action Proxy Request and Response

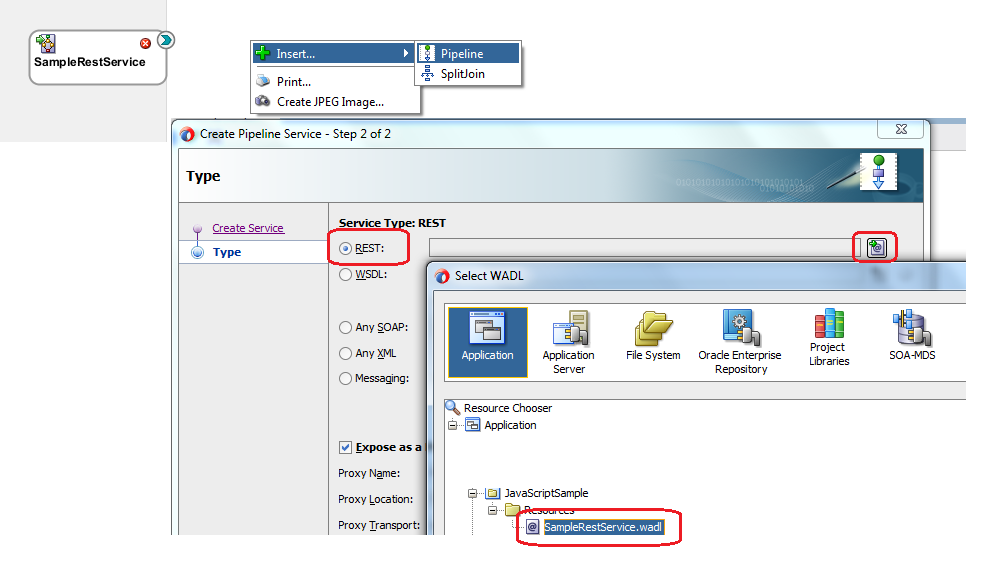
 Add Pipeline where service type is REST and choose the proxy WADL file for the same. Ensure that expose as proxy option is unchecked.

OSB 12c JavaScript Action PipeLine

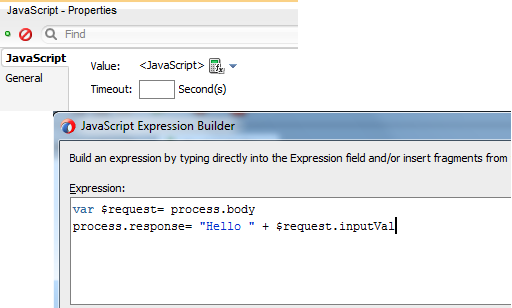
Link pipeline with proxy service. Inside pipeline, add pipeline node and first in request pipeline add one JavaScript action. Open the JavaScript action and click on Value expression.

In Expression, add below text.

var $request = process.body
process.response= “Hello ” + $request.inputVal

Here $request is variable and process.body contains the request JSON data so I assign request JSON to request variable.

imputVal is the element name that we receive in request so to access that I used $request.inputVal expression and “Hello ” is appended to that and assigned to process.response.

OSB 12c JavaScript Action
OSB12c JavaScript Action Expression

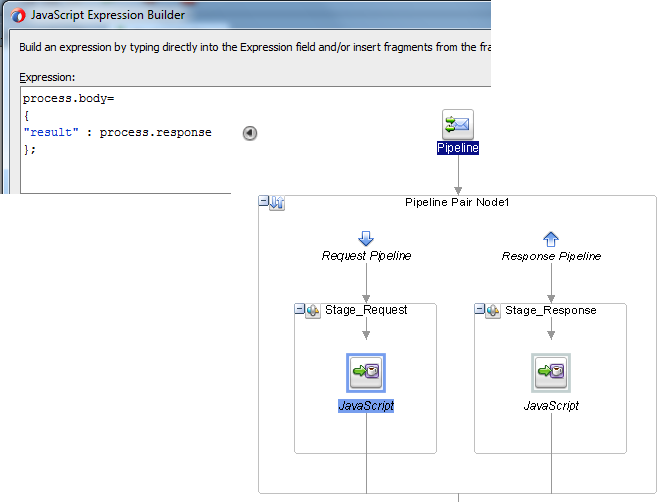
Now add another JavaScript action in response pipeline to create response JSON, click on Value expression and add below text.
process.body={“result” : process.response};

OSB 12c JavaScript Action Response

Test the flow by using the request JSON and you see the response JSON as shown below.

OSB12c JavaScript Action Testing

SOAP Version Mismatch Issue Using OSB 12c

we discovered a version mismatch issue in which two SOAP services on different versions (Service-A on SOAP 1.2 and Service-B on SOAP 1.1) were failing to communicate with each other. Here, we explain how to resolve this issue.

Difference between SOAP 1.1 and SOAP 1.2

Before diving into the solution, let’s look at the improvements SOAP Version 1.2 provides over SOAP 1.1.

  1. Offers a clear processing model;
  2. Provides improved interoperability with testing and implementation requirements;
  3. Based on XML Information Set (i.e. It is specified as an Infoset, which is carried from one SOAP node to another, whereas SOAP 1.1 was based on XML 1.0 serialization.);
  4. Offers protocol independence for developers by providing a binding framework;
  5. Includes HTTP binding for improved integration to the World Wide Web;
  6. Delivers a well-defined extensibility model; and
  7. Provides improved support for Web standards.

WSDL changes observed in SOAP 1.2

  1. Namespace Changes: SOAP 1.2 supports the following namespace definition:
1 xmlns:soap12=<strong>“http://www.w3.org/2003/05/soap-envelope”</strong>

2.  SOAP 1.2 uses “application/soap+xml” as the Content Type, whereas SOAP 1.1 uses “text/xml”.

3.  SOAP:Operation and SOAP Binding must be specified in SOAP 1.2 WSDL.

Solution

Now, to overcome the versioning mismatch issue mentioned above, we must follow these steps:

  1. Generate the OSB Proxy as a Message Based Proxy service. This will be based on the XSD with only the “body” part with required parameters to call Service-A (SOAP 1.2) and Service-B (SOAP 1.1).
  2. Create a Pipeline Service based on the same methodology explained in number 1, above.
  3. In the Pipeline Service, navigate to Message Flow and add a Pipeline Pair – rename it per the process standards.
  4. In the Request Pipeline node, add a Stage and rename it per process standards.
  5. Inside the Stage, add a Service Callout, then browse for the Proxy Service for the wrapper of Service-A or the business service of Service-A. The Service Callout configuration is shown below with the required message to Service-A parameters assigned. 
  6. After the above Pipeline Pair is complete, add a Route Node.
  7. Inside the Route Node, add a Routing Operation and configure the same for the Business Service of Service-B.
  8. Inside the Request Actions, assign or replace the Body and Header to make a successful call for Business Service. The following snapshot illustrates this.  

Deploy to Application Container Cloud Service from Oracle Storage Cloud via REST API

As mentioned in my previous post about Application container cloud. We can use two options to upload application archive to ACSS

  • UI console (Already covered in previous post)
  • From Stroge cloud service via REST API

In this post, we will talk about upload archive via storage cloud Service using REST API. There is two steps for that

  1. Store archive to Storage Cloud service.
  2. Deploy Archive to ACCS.

tttttt

Information credentials for cloud account should be handy as identity, domain, password for using in REST API. Using cURL scripts to upload your application to the storage service.


Note :  cURL is a tool to transfer data from or to a server, using one of the supported protocols (DICT, FILE, FTP, FTPS, GOPHER, HTTP, HTTPS, IMAP, IMAPS, LDAP, LDAPS, POP3, POP3S, RTMP, RTSP, SCP, SFTP, SMB, SMBS, SMTP, SMTPS, TELNET and TFTP.


Store archive to Storage Cloud service


Before uploading in Storage cloud, We need to build container in Storage Cloud Service. Either you can via Storage cloud UI console. Building using UI console is pretty easy and straightforward.


We will create container via curl command.

  1. Below Script will create storage container.    
# CREATE STORAGE CONTAINER
curl -i -X PUT \ -u User-Name:Password \ https://hostname/v1/Storage-Identity-Domain/App-Name


  1. Now upload your application archive to the storage container.
# PUT ARCHIVE IN STORAGE CONTAINER
curl -i -X PUT \-u User-Name:Password \ https://hostname/v1/Storage-Identity-Domain/App-Name/Archive-File-Name -T Path-to-local-file/Archive-File-Name

For example use following script to upload it

curl -i -X PUT \ -u sampleUserName:samplePassword \ https://storage.oraclecloud.com/v1/Storagecontainer/DeveloperSkillsApp/SpringBootJpaDev-1.0-dist.zip -T target/SpringBootJpaDev-1.0-dist.zip

After running these script, it is uploaded to Storage cloud container.


Deploy Archive to ACCS –

After uploading archive to Storage cloud servicee, ACC’s deployment procedure can be invoked. We need to provide standard set of information while deploying. Sample schema of script should be as follows

# Mock Deployment Script
url -i -X POST  \
  -u User-Name:Password \
  -H "X-ID-TENANT-NAME:Identity-Domain" \
  -H "Content-Type: multipart/form-data" \
  -F "name=App-Name" \
  -F "runtime=java" \
  -F "subscription=Monthly" \
  -F "[email protected]" \
  -F "archiveURL=App-name/Archive-File-Name" \
  -F "notes=Your Notes here" \
  https://hostname/paas/service/apaas/api/v1.1/apps/Identity-Domain

Trying to upload with following script –

curl -v -u "USERNAME:PASSWORD” -X POST -H "X-ID-TENANT-NAME: IDENTITY_DOMAIN" -H "Content-Type: multipart/form-data" -F "name=Developer-skills-service" -F "runtime=java" -F "subscription=Monthly" -F "archiveURL= Storagecontainer/SpringBootJpaDev-1.0-dist.zip " -F "notes=Developer Skills Service Deployment" https://apaas.REGION.oraclecloud.com/paas/service/apaas/api/v1.1/apps/IDENTITY_DOMAIN


When you deploy your application, you can reference a deployment.json file. Information about deployment like memory , instances etc. can be pass via deployment.json.


You can automate these two process using maven. You can also configured this by maven plugin in Oracle Developer cloud services.


That’s all for now. Happy Oracle Cloud learning.