Introduction to Docker and Docker Compose

Aim- What is Docker and Docker Compose. I will try to explain about linux container then goes more into Docker and Docker Compose for a beginner.

Now in this cloud buzz world, what developers want –

● Scalability, maintainability, Agility, Portability.
● DevOps tools.
● Improved resource utilization.
● A continuum of abstraction levels.

Linux Containers -contain applications in a way that keep them isolated from the host system that they run on. Containers allow a developer to package up an application with all of the parts it needs, such as libraries and other dependencies, and ship it all out as one package. And they are designed to make it easier to provide a consistent experience as developers and system administrators move code from development environments into production in a fast and replicable way.
In a way, containers behave like a virtual machine. To the outside world, they can look like their own complete system. But unlike a virtual machine, rather than creating a whole virtual operating system, containers don’t need to replicate an entire operating system, only the individual components they need in order to operate. This gives a significant performance boost and reduces the size of the application. They also operate much faster, as unlike traditional virtualization the process is essentially running natively on its host, just with an additional layer of protection around it

Linux Containers
● Use Linux kernel isolation features to give a VM like environment.
● Process isolation /Sandboxing.
● Example: Lxc, lmctfy, Docker.

Now, What is Docker
● An easy to use Linux container technology.
● Docker image format.
● It helps in application packaging and delivery.

Docker is a tool that can package an application and its dependencies in a virtual container that can run on any Linux server. This helps enable flexibility and portability on where the application can run, whether on-premises, public cloud, private cloud, bare metal, etc. (Wikipedia)


Docker Vs Virtualization-

– Docker is lighter than virtual machines.
– The size of Docker images is very small compared.
– We can run more Docker container on a reasonably sized host.
– Deploying and scaling is relatively easy.
– Docker has less start up time.

Technologies behind docker
● Control groups:
○ Control Groups are another key component of Linux Containers
○ With Cgroup we can implement resource accounting and limit.
○ Ensure that each container gets its fair share of memory, CPU, disk I/O.
○ Thanks to Cgroup, we can make sure that single container cannot bring the system down by exhausting resources.

● Union file systems: ○ Layered file system so you can have a read only part and a write part, and merge those together. ○ Docker images made up with are layers.

● Namespaces
○ It helps to create an isolated workspace for each process.
○ When you run a container, Docker creates a set of namespaces for that container.
● SELinux
○ SELinux provides secure separation of containers by applying SELinux policy and labels.

What are components of Dockers

Docker Images – An image is an inert, immutable, file that’s essentially a snapshot of a container. Images are created with the build command, and they’ll produce a container when started with a run. Images are stored in a Docker registry such as registry.hub.docker.com
Docker containers – is an open source software development platform. Its main benefit is to package applications in “containers,” allowing them to be portable to any system running the Linux operating system
Docker Hub – is a cloud-based registry service which allows you to link to code repositories, build your images and test them, stores manually pushed images, and links to Docker Cloud so you can deploy images to your hosts
Docker Registry -is a cloud-based registry service which allows you to link to code repositories, build your images and test them, stores manually pushed images, and links to Docker Cloud so you can deploy images to your hosts
Docker daemon -This is the part which does rest of the magic and knows how to talk to the kernel, makes the system calls to create, operate and manage containers, which we as users of Docker dont have to worry about.
Docker client – This is the utility we use when we run any docker commands e.g. docker run (Docker container run), Docker images, docker ps etc. It allows us to run these commands which a human can easily understand.

docker

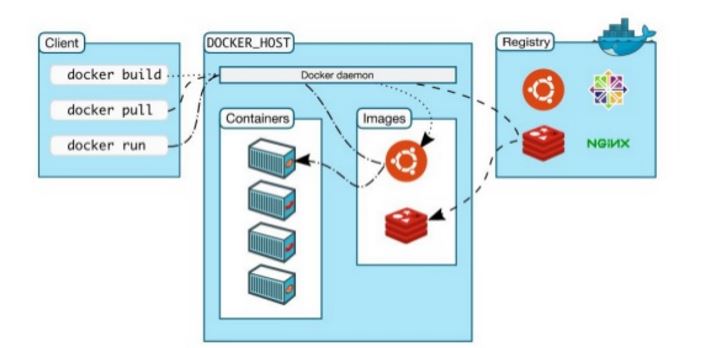
As you see above screen shot, we have docker client where the user performs build, pull and run operation.The client interacts with a host which contains different container, Docker Daemon and images via Registry.

If you guy reading this line, then you must be getting something about docker now. You know basic components and vocabulary.
Now let’s take an example of real life applications.
● One application consists of multiple containers.
● One container is dependent on another.
● Mutual dependency/ startup order.
● Process involves building containers and then deploy them
● Long docker run commands
● Complexity is proportional to the number of containers involved

dockerwithMultiContainer

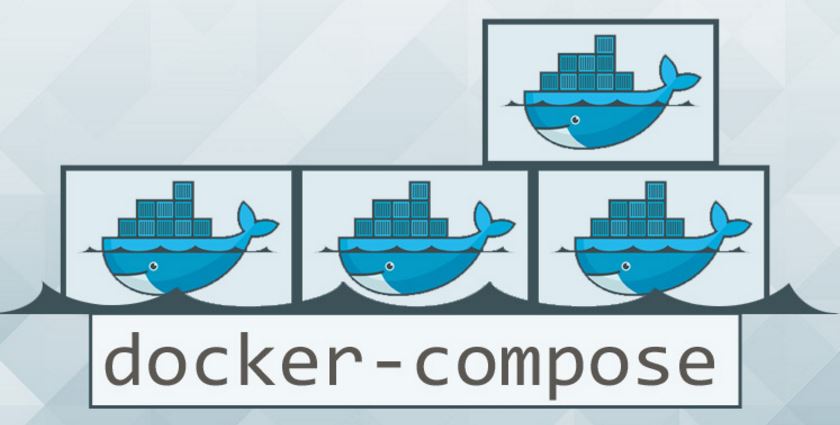
Take example of above image, this will look multicontainer docker .The containers include (1) NGINX container, (3) Tomcat containers, (1) MongoDB container, and (1) ELK container. But have’t docker came to help us, This look quite difficult process to manage it all. To rescue us, Docker Compose is there.

Docker Compose is a tool for defining and running multi-container Docker applications. With Compose, you use a Compose file to configure your application’s services. Then, using a single command, you create and start all the services from your configuration.Compose is great for development, testing, and staging environments, as well as CI workflows.

compose

Docker Compose
● Tool for defining and running multi-container Docker application.It is a YML file and compose contains information about how to build the containers and deploy containers. It is integrated with Docker Swarm. It competes with Kubernetes.

Compose is basically a three-step process.

1- Define your app’s environment with a Dockerfile so it can be reproduced anywhere.
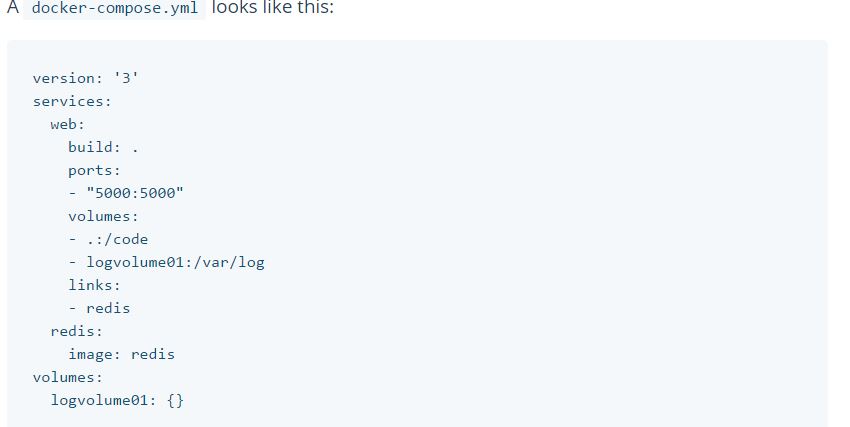
2- Define the services that make up your app in docker-compose.yml so they can be run together in an isolated environment.
3- Lastly, run docker-compose up and Compose will start and run your entire app.

docker-yml

You can explore more with Docker Swarm, which I will explain in next post. Till then happy learning with Vinay

Build Secure Application Using JSON Web Tokens (JWT)

JSON Web Token (JWT) is a compact, URL-safe means of representing claims to be transferred between two parties. The claims in a JWT are encoded as a JSON object that is used as the payload of a JSON Web Signature (JWS) structure or as the plaintext of a JSON Web Encryption (JWE) structure, enabling the claims to be digitally signed or integrity protected with a Message Authentication Code (MAC) and/or encrypted.

Below picture will give more better explanation

The claims in a JWT are encoded as a JSON object that is base64url encoded and consists of zero or more name/value pairs (or members), where the names are strings and the values are arbitrary JSON values. Each member is a claim represented by the JWT.

What JWT contains – JWT consists of three main components: a header object, payload object, and a signature. These three properties are encoded using base64, then concatenated with periods as separators.

for example

xxxxxxxxxxxxxxxxxx.yyyy.zzzzzzzzzzzzzzzzzzzzzzzzz

xxxxxxxxxxxxxxxxxxxxx – header
yyyy – – claims/payload
zzzzzzzzzzzzzzzzzzzz – signature

Header: The header contains the metadata for the token and at a minimal contains the type of the signature and/or encryption algorithm
Claims: The claims contains any information that you want signed
JSON Web Signature (JWS): The headers and claims digitally signed using the algorithm in the specified in the headerStructure of a JWT

JSON Web Token example:

eyJhbGciOiJIUzI1NiIsInR5cCI6IkpXVCJ9.eyJpc3MiOiJ0b3B0YWwuY29tI iwiZXhwIjoxNDI2NDIwODAwLCJodHRwOi8vdG9wdGFsLmNvbS9qd3RfY2xhaW1zL2lzX2FkbWluI jp0cnVlLCJjb21wYW55IjoiVG9wdGFsIiwiYXdlc29tZSI6dHJ1ZX0.yRQYnWzskCZUxPwaQupWk iUzKELZ49eM7oWxAQK_ZXw

Since there are 3 parts separated by a ., each section is created differently. We have the 3 parts which are:

header
payload
signature
..

Header

The JWT Header declares that the encoded object is a JSON Web Token (JWT) and the JWT is a JWS that is MACed using the HMAC SHA-256 algorithm. For example:

{
“alg”: “HS256”,
“typ”: “JWT”
}
“alg” is a string and specifies the algorithm used to sign the token.

“typ” is a string for the token, defaulted to “JWT”. Specifies that this is a JWT token.

Payload (Claims)

A claim or a payload can be defined as a statement about an entity that contians security information as well as additional meta data about the token itself.

Following are the claim attributes :

iss: The issuer of the token

sub: The subject of the token

aud: The audience of the token

qsh: query string hash

exp: Token expiration time defined in Unix time

nbf: “Not before” time that identifies the time before which the JWT must not be accepted for processing

iat: “Issued at” time, in Unix time, at which the token was issued

jti: JWT ID claim provides a unique identifier for the JWT

Signature

JSON Web Signatre specification are followed to generate the final signed token. JWT Header, the encoded claim are combined, and an encryption algorithm, such as HMAC SHA-256 is applied. The signatures’s secret key is held by the server so it will be able to verify existing tokens.

JWT-Real world

Advantages of Token Based Approach

JWT approach allows us to make AJAX calls to any server or domain. Since the HTTP header is used to transmit the user information.

Their is no need for having a separate session store on the server. JWT itself conveys the entire information.

Server Side reduces to just an API and static assets(HTML, CSS, JS) can be served via a CDN.

The authentication system is mobile ready, the token can be generated on any device.

Since we have eliminated the need for cookies, we no more need to protect against the cross site requesets.

API Keys provide either-or solution, whereas JWT provide much granular control, which can be inspected for any debugging purpose.

API Keys depend on a central storage and a service. JWT can be self-issued or an external service can issue it with allowed scopes and expiration.

You can use jwt in node.js, angular.js, ruby, Java, .net and other frameworks.
Following is example of JWT generator and verify jwt token

Generate Tokens

import javax.crypto.spec.SecretKeySpec;
import javax.xml.bind.DatatypeConverter;
import java.security.Key;
import io.jsonwebtoken.*;
import java.util.Date;    

//Sample method to construct a JWT

private String createJWT(String id, String issuer, String subject, long ttlMillis) {

//The JWT signature algorithm we will be using to sign the token
SignatureAlgorithm signatureAlgorithm = SignatureAlgorithm.HS256;

long nowMillis = System.currentTimeMillis();
Date now = new Date(nowMillis);

//We will sign our JWT with our ApiKey secret
byte[] apiKeySecretBytes = DatatypeConverter.parseBase64Binary(apiKey.getSecret());
Key signingKey = new SecretKeySpec(apiKeySecretBytes, signatureAlgorithm.getJcaName());

  //Let's set the JWT Claims
JwtBuilder builder = Jwts.builder().setId(id)
                                .setIssuedAt(now)
                                .setSubject(subject)
                                .setIssuer(issuer)
                                .signWith(signatureAlgorithm, signingKey);

 //if it has been specified, let's add the expiration
if (ttlMillis >= 0) {
    long expMillis = nowMillis + ttlMillis;
    Date exp = new Date(expMillis);
    builder.setExpiration(exp);
}

 //Builds the JWT and serializes it to a compact, URL-safe string
return builder.compact();
}

Decode and Verify Tokens

import javax.xml.bind.DatatypeConverter;
import io.jsonwebtoken.Jwts;
import io.jsonwebtoken.Claims;

//Sample method to validate and read the JWT
private void parseJWT(String jwt) {
//This line will throw an exception if it is not a signed JWS (as expected)
Claims claims = Jwts.parser()         
   .setSigningKey(DatatypeConverter.parseBase64Binary(apiKey.getSecret()))
   .parseClaimsJws(jwt).getBody();
System.out.println("ID: " + claims.getId());
System.out.println("Subject: " + claims.getSubject());
System.out.println("Issuer: " + claims.getIssuer());
System.out.println("Expiration: " + claims.getExpiration());
}

Happy secure API call with Vinay in techartifact . 🙂

– See more at:
http://blog.apcelent.com/json-web-token-tutorial-example-python.html#sthash.GzZriR3U.dpuf
http://angular-tips.com/blog/2014/05/json-web-tokens-introduction/

How to Create and verify JWTs in Java

Insights of Angular.js

Angular.js is a JavaScript framework that appeared late on the scene in 2012, learning from initial offerings, and with the backing of Google, able to change the playing field somewhat. The Google resources injected into its development were large, and resulted in a very powerful product with massive ongoing support.AngularJS is an open-source web application framework, maintained by Google and community, that assists with creating single-page applications, one-page web applications that only require HTML, CSS, and JavaScript on the client side. Its goal is to augment web applications with model–view–controller (MVC) capability, in an effort to make both development and testing easier.

The library reads in HTML that contains additional custom tag attributes; it then obeys the directives in those custom attributes, and binds input or output parts of the page to a model represented by standard JavaScript variables. The values of those JavaScript variables can be manually set, or retrieved from static or dynamic JSON resources.

However, the power and purity of MVC implementation came with a big price – complexity. Angular is not for the faint hearted, with some scary and often perverse syntax to stumble through. You will also find that the power keeps drawing you back into it’s grasp, but you will repeatedly find that Angular tutorial sites teach from the inside out, rather than from where you are to where you want to go. The Google reference site is particularly terse and obscure to newcomers.

Why AngularJS?

AngularJS is a MVC framework that defines numerous concepts to properly organize your web application. Your application is defined with modules that can depend from one to the others. It enhances HTML by attaching directives to your pages with new attributes or tags and expressions in order to define very powerful templates directly in your HTML. It also encapsulates the behavior of your application in controllers which are instanciated thanks to dependency injection. Thanks to the use of dependency injection, AngularJS helps you structure and test your Javascript code very easily. Finally, utility code can easily be factorized into services that can be injected in your controllers. Now let’s have a closer look at all those features.

Notable directives
AngularJS directives allow the developer to specify custom and reusable HTML tags that moderate the behavior of certain elements.

ng-app
Declares an element as a root element of the application allowing behavior to be modified through custom HTML tags.
ng-bind
Automatically changes the text of an HTML element to the value of a given expression.
ng-model
Similar to ng-bind, but allows two-way data binding between the view and the scope.
ng-class
Allows class attributes to be dynamically loaded.
ng-controller
Specifies a JavaScript controller class that evaluates HTML expressions.
ng-repeat
Instantiate an element once per item from a collection.
ng-show & ng-hide
Conditionally show or hide an element, depending on the value of a boolean expression. Show and hide is achieved by setting the CSS display style.
ng-switch
Conditionally instantiate one template from a set of choices, depending on the value of a selection expression.
ng-view
The base directive responsible for handling routes that resolve JSON before rendering templates driven by specified controllers.
ng-if
Basic if statement directive which allow to show the following element if the conditions are true. When the condition is false, the element is removed from the DOM. When true, a clone of the compiled element is re-inserted.

How Angular works

The key powers of Angular.js are :

Live, bi-directional binding of web display data to the data model
Separation of data, logic and presentation code
An HTML-based, extensible syntax
Standard functionality in a single, small footprint JavaScript file

1. Bi-directional data binding

If you type into this box you will see the 2-way data binding in action :

The input field is connected to the data model, so the value you typed was immediately stored in that model. The same value was immediately reflected back on the right in a display field that was also linked to the model.
If you are familiar with JavaScript, you may rightly point out that this data reflection effect can be achieved by injecting the current input box content into a div after it, by attaching an onKeyUp event. Angular will likely use this event also. But the point here is that with Angular, you define relationships and let Angular determine such event processing behind the scenes.

In effect, Angular web pages are better described as state machines rather than event driven ones. The mindset to think state-wise rather than event-wise or procedurally is one of the hard parts about acclimatising to Angular.

2. Separation of data, logic and presentation code

The diagram below shows the basic structure of a typical Angular-based web site :

Overview

You do not need to use a database of course – your data model could simply be hard coded. But most sites will be using Angular to better manage the complexity of data retrieval, storage and display. JavaScript arrays and objects are used to represent the database data in the data model.

Database data can be preloaded into the model in full or in part, with asynchronous retrieval and storage requests handled via Angular code, as you keep the database and data model in sync.

By largely distilling out the HTML code, with its hooks to the data model, changes to the appearance are less likely to require data handling changes.

3. An HTML-based, extensible syntax

You are not limited to the Angular supplied HTM extensions such as ng-model above. For those wary of standards, Angular recognises that this extension does not rigidly adhere to naming standards, so they support the data- prefix to bring it into line, like this : data-ng-model.

By encapsulating the effect of these new HTML elements and attributes, reusable code can be developed more easily. Write once, deploy many times is always an ideal we can strive for.

4. Standard functionality in a single, small footprint JavaScript file

Whilst there are additional Angular JavaScript files such as its ui suite (angular-ui.js), the core functionality is contained in a relatively small footprint file. A homogenous approach to the MVC framework idea. Whilst Angular is rich and complex, you are essentially developing with one set of tools, not a suite of unrelated applets.

Angular operation

Angular operates by traversing the web page Document Object Model (DOM). It interprets the element tags and attributes in conjunction with the data model and controller logic to dynamically alter the HTML code and its rendering. It supplies all the event handling in support of the live two-way data binding.

Part of the complexity of Angular is that much of its internal mechanics are exposed to the developer. This is needed, alas, in order to perform some data control logic. But they really should have provided more intelligible wrappers to hide the internals better. It is likely that you will therefore become involved in the internal linking and compiling that Angular carries out. I will, however, try to keep the explanations simple, not least because I found the concepts hard to grasp myself.

Reference – http://www.angularbasics.co.uk/#

Happy Learning with Angular.js in techartifact. Stay tuned for more on Angular.js