Elastic Search-Beginner Tutorial for Oracle FMW users

ElasticSearch is an Open Source (Apache 2), Distributed Search Engine built on top of Apache Lucene.

Elasticsearch is a NOSQL, distributed full text database. Which means that this database is document based instead of using tables or schema, we use documents. Elasticsearch is much more than just Lucene and much more than “just” full text search. It is also:A distributed real-time document store where every field is indexed and searchable. A distributed search engine with real-time analytics. Capable of scaling to hundreds of servers and petabytes(Figure -1) of structured and unstructured data .

History – The project was started in 2010 by Shay Banon. Shay wanted to create a storage and search engine that would be easy to operate. Elasticsearch is based on the Lucene engine on top of which Shay added an http rest interface which resulted in a distributed search engine that is incredibly easy to scale and returns results at lightning speed

Need of Elasticsearch As a developer or business guy who is used to traditional relational databases, we often face challenges to find information in millions of record in rdbms table. Suppose developer had to search in millions of record in table with 100’s of column. Think about the search time. I am sure, who tried, and they frustrated to build a fast system. Situation gets worst, when it needed to search tables that had millions of records, resulting in overly complex database views/stored-procedures and adding full text search on relational database fields. Something which I personally dislike, as it made the database twice the size and the speed was not optimal either. Relational databases are simply not built for such operations.

In normal RDBMS table, we try searching like searchParam

Select * from tableName WHERE columnName LIKE ‘%searchParam %’;

I am sure, by like this, you can’t search everything and it’s not performance optimal.
Now with Elasticsearch we can achieve the speed we would like, as it lets us index millions of documents. Now definitely, we need a system of something, in which we can make search faster.

Real usecase-

Elasticsearch can be used for various usage, for example it can be used as a blog storage engine in case you would like your blog to be searchable. Traditional SQL doesn’t readily give you the means to do that.
How about Analytics tools? Most software generates tons of data that is worth analyzing, Elasticsearch comes with Logstash and Kibanato give you a full analytics system.
Finally, I like to see Elasticsearch as Data ware house, where you have documents with many different attributes and non-predictable schemas. Since Elasticsearch is schemaless, it won’t matter that you store various documents there, you will still be able to search them easily and quickly.On the other hand having a powerful tool like Kibana would allow you to have a custom dashboard that gives the opportunity for non-technical managers to view and analyze this data.

For me real use case to build search engine with over 5 erp for my organization. A search engine, where we can search almost everything within company different ERP system. In my organization,we have 5 different ERP system, which caters different use case for different business unit. So there are 5 data source, in which I need to make search. User will have one search field, on which they can search anything without mentioning what they want to search it.Portal should display all result based on search param to user. Sounds interesting? J Believe me it’s more challenging than, it sounds interesting 😛

ElasticSearch can be good fit here. We can get all information from 5 different ERP and do data indexing and after that search will be very faster and awesome , same as google.

How Elasticsearch saves data?
Elasticsearch does not have tables, and a schema is not required. Elasticsearch stores data documents that consist of JSON strings inside an index.

The field is like the columns of the SQL database and the value represents the data in the row cells.

When you save a document in Elasticsearch, you save it in an index. An

ElasticSearch is a great open source search engine built on top of Apache Lucene. Its features and upgrades allow it to basically function just like a schema-less JSON datastore that can be accessed using both search queries and regular database CRUD commands.

Here are the main “disadvantages” I see:

  • Transactions – There is no support for transactions or processing on data manipulation.
  • Data Availability – ES makes data available in “near real-time” which may require additional considerations in your application (ie: comments page where a user adds new comment, refreshing the page might not actually show the new post because the index is still updating).
  • Durability – ES is distributed and fairly stable but backups and durability are not as high priority as in other data stores. ElasticSearch has come a long way in the past few years since this original answer and now has better features, backup methods and even realtime indexing. Please review the official site for more information.

If you can deal with these issues then there’s certainly no reason why you can’t use ElasticSearch as your primary data store. It can actually lower complexity and improve performance by not having to duplicate your data but again this depends on your specific use case.

index is like a database in relational database. An index is saved across multiple shards and shards are then stored in one or more servers which are called nodes, multiple nodes form a cluster.


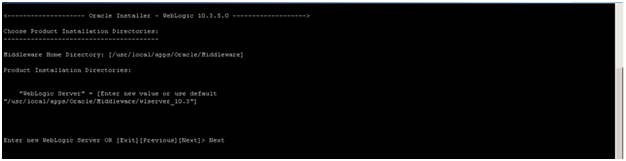
You can download the latest version of Elasticsearch from elasticsearch.org/download.

curl -L -O http://download.elasticsearch.org/PATH/TO/VERSION.zip
unzip elasticsearch-$VERSION.zip
cd  elasticsearch-$VERSION

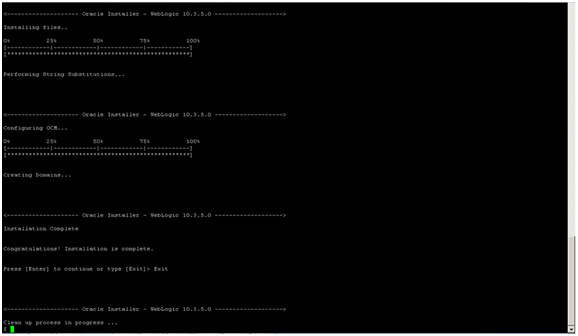
Elasticsearch is now ready to run. You can start it up in the foreground with:

./bin/elasticsearch

Add -d if you want to run it in the background as a daemon.

Test it out by opening another terminal window and running:

curl ‘http://localhost:9200/?pretty’

You should see a response like this:

{

   “status”: 200,

   “name”: “Shrunken Bones”,

   “version”: {

      “number”: “1.4.0”,

      “lucene_version”: “4.10”

   },

   “tagline”: “You Know, for Search”

}

This means that your Elasticsearch cluster is up and running, and we can start experimenting with it.

Clusters and nodes

A node is a running instance of Elasticsearch. A cluster is a group of nodes with the same cluster.name that are working together to share data and to provide failover and scale, although a single node can form a cluster all by itself.


You should change the default cluster.name to something appropriate to you, like your own name, to stop your nodes from trying to join another cluster on the same network with the same name!

You can do this by editing the elasticsearch.yml file in the config/ directory, then restarting Elasticsearch. When Elasticsearch is running in the foreground, you can stop it by pressing Ctrl-C, otherwise you can shut it down with the api

curl –XPOST ‘http://localhost:9200/_shutdown’

Some of common terminologies in elastic search-

Cluster

A cluster is a collection of one or more nodes (servers) that together holds your entire data and provides federated indexing and search capabilities across all nodes. A cluster is identified by a unique name which by default is “elasticsearch”. This name is important because a node can only be part of a cluster if the node is set up to join the cluster by its name.

Node

A node is a single server that is part of your cluster, stores your data, and participates in the cluster’s indexing and search capabilities. Just like a cluster, a node is identified by a name which by default is a random Marvel character name that is assigned to the node at startup. You can define any node name you want if you do not want the default. This name is important for administration purposes where you want to identify which servers in your network correspond to which nodes in your Elasticsearch cluster.

Index

An index is a collection of documents that have somewhat similar characteristics. For example, you can have an index for customer data, another index for a product catalog, and yet another index for order data. You will provide different index name for different data. An index is identified by a name and this name is used to refer to the index when performing indexing, search, update, and delete operations against the documents in it.

Shards & Replicas

An index can potentially store a large amount of data that can exceed the hardware limits of a single node. For example, a single index of a billion documents taking up 1TB of disk space may not fit on the disk of a single node or may be too slow to serve search requests from a single node alone.

To solve this problem, Elasticsearch provides the ability to subdivide your index into multiple pieces called shards. When you create an index, you can simply define the number of shards that you want. Each shard is in itself a fully-functional and independent “index” that can be hosted on any node in the cluster.

Now talking about how elastic search can help in Oracle ADF/WebCenter or fusion middleware technologies.

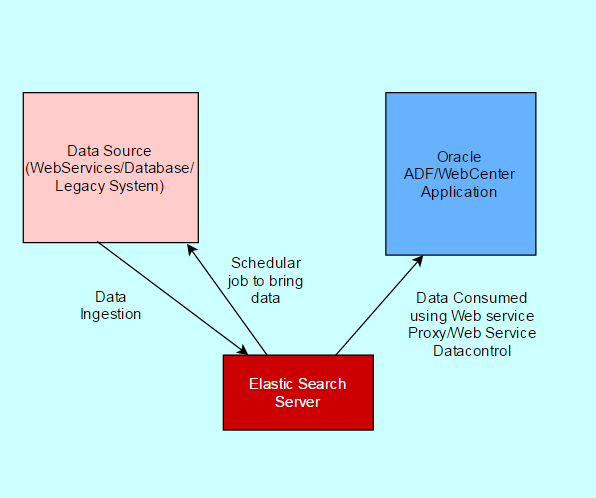
I will be publishing series of tutorial for elasticSearch. Will try to show, how we can use with ADF/Webcenter portal as well.Following architecture can be used in ADF/WebCenter Portal Application.

elasticsearchadf


Elastic Search is very fast in comparison to ADF Search. In ADF, you can search using query panel or custom search box. With this you can combine all data on backend and search with one inputText to all tables schema or all backend data. Search response time is in ms. In WebCenter Portal Oracle Secure Enterprise Search is also going to replace with Elastic Search. So its good time to get into this.

Elastic Search can also be used in WebCenter content to searching documents.  See one of great demo by Team Informatics in this youtube channel.

We can also use Apache Kafka with elastic search for real time data ingestion and searching. I will cover in coming post.

Till then, Happy searching by elasticSearch with Vinay in techartifact. Data source can be webservices, data base or live streaming data. In this, we have schedular to bring data or ingest data in elastic search server. ADF/WebCenter Portal application can consume data using querying into Elastic Search Server.


Ref – https://www.elastic.co/guide/en/elasticsearch/reference/2.2/_basic_concepts.html  http://joelabrahamsson.com/elasticsearch-101/

JSON web token (JWT) implementation in Java

In my previous article , I talked about JWT introduction and how it works. There are multiple libraries by which you can implement JWT in Java.

1. Java JWT: JSON Web Token for Java and Android

Installation

Use your favorite Maven-compatible build tool to pull the dependency (and its transitive dependencies) from Maven Central:

Maven:

<dependency>
    <groupId>io.jsonwebtoken</groupId>
    <artifactId>jjwt</artifactId>
    <version>0.6.0</version>
</dependency>


Gradle:


dependencies {
    compile 'io.jsonwebtoken:jjwt:0.6.0'
}

Note: JJWT depends on Jackson 2.x. If you’re already using an older version of Jackson in your app, read this

Usage

Most complexity is hidden behind a convenient and readable builder-based fluent interface, great for relying on IDE auto-completion to write code quickly. Here’s an example:

import io.jsonwebtoken.Jwts;
import io.jsonwebtoken.SignatureAlgorithm;
import io.jsonwebtoken.impl.crypto.MacProvider;
import java.security.Key;

// We need a signing key, so we'll create one just for this example. Usually
// the key would be read from your application configuration instead.
Key key = MacProvider.generateKey();

String s = Jwts.builder().setSubject("Joe").signWith(SignatureAlgorithm.HS512, key).compact();
How easy was that!?

Now let's verify the JWT (you should always discard JWTs that don't match an expected signature):

assert Jwts.parser().setSigningKey(key).parseClaimsJws(s).getBody().getSubject().equals("Joe");
You have to love one-line code snippets!

But what if signature validation failed? You can catch SignatureException and react accordingly:

try {

    Jwts.parser().setSigningKey(key).parseClaimsJws(compactJwt);

    //OK, we can trust this JWT

} catch (SignatureException e) {

    //don't trust the JWT!
}

2. Using Nimbus Jose + JWT

The most popular and robust Java library for JSON Web Tokens (JWT)
Supports all standard signature (JWS) and encryption (JWE) algorithms
Open source Apache 2.0 licence

Features –

– Signed / encrypted tokens, such as bearer access tokens in OAuth 2.0 or OpenID Connect identity tokens;
– Self-contained API keys, with optional revocation;
– Protecting content and messages;
– Authenticating clients and web API requests.

Use in Java

// Create an HMAC-protected JWS object with some payload
JWSObject jwsObject = new JWSObject(new JWSHeader(JWSAlgorithm.HS256),
                                    new Payload("Hello world!"));

// We need a 256-bit key for HS256 which must be pre-shared
byte[] sharedKey = new byte[32];
new SecureRandom().nextBytes(sharedKey);

// Apply the HMAC to the JWS object
jwsObject.sign(new MACSigner(sharedKey));

// Output to URL-safe format
jwsObject.serialize(); 

Maven configuration

Maven
For Java 7+ :

<dependency>
    <groupId>com.nimbusds</groupId>
    <artifactId>nimbus-jose-jwt</artifactId>
    <version>4.11.2</version>
</dependency>

3. JSON token library – It depend on Google Guava.The library is in fact used by Google Wallet.

Here is how to create a jwt, and to verify it and deserialize it:

Maven –

<dependency>
    <groupId>com.googlecode.jsontoken</groupId>
    <artifactId>jsontoken</artifactId>
    <version>1.0</version>
</dependency>
<dependency>
    <groupId>com.google.guava</groupId>
    <artifactId>guava</artifactId>
    <version>18.0</version>
</dependency>

and Java implementation –

import java.security.InvalidKeyException;
import java.security.SignatureException;
import java.util.Calendar;
import java.util.List;

import net.oauth.jsontoken.JsonToken;
import net.oauth.jsontoken.JsonTokenParser;
import net.oauth.jsontoken.crypto.HmacSHA256Signer;
import net.oauth.jsontoken.crypto.HmacSHA256Verifier;
import net.oauth.jsontoken.crypto.SignatureAlgorithm;
import net.oauth.jsontoken.crypto.Verifier;
import net.oauth.jsontoken.discovery.VerifierProvider;
import net.oauth.jsontoken.discovery.VerifierProviders;

import org.apache.commons.lang3.StringUtils;
import org.bson.types.ObjectId;
import org.joda.time.DateTime;

import com.google.common.collect.Lists;
import com.google.gson.JsonObject;


/**
 * Provides static methods for creating and verifying access tokens and such. 
 * @author davidm
 *
 */
public class AuthHelper {

    private static final String AUDIENCE = "NotReallyImportant";

    private static final String ISSUER = "YourCompanyOrAppNameHere";

    private static final String SIGNING_KEY = "[email protected]^($%*$%";

    /**
     * Creates a json web token which is a digitally signed token that contains a payload (e.g. userId to identify 
     * the user). The signing key is secret. That ensures that the token is authentic and has not been modified.
     * Using a jwt eliminates the need to store authentication session information in a database.
     * @param userId
     * @param durationDays
     * @return
     */
    public static String createJsonWebToken(String userId, Long durationDays)    {
        //Current time and signing algorithm
        Calendar cal = Calendar.getInstance();
        HmacSHA256Signer signer;
        try {
            signer = new HmacSHA256Signer(ISSUER, null, SIGNING_KEY.getBytes());
        } catch (InvalidKeyException e) {
            throw new RuntimeException(e);
        }

        //Configure JSON token
        JsonToken token = new net.oauth.jsontoken.JsonToken(signer);
        token.setAudience(AUDIENCE);
        token.setIssuedAt(new org.joda.time.Instant(cal.getTimeInMillis()));
        token.setExpiration(new org.joda.time.Instant(cal.getTimeInMillis() + 1000L * 60L * 60L * 24L * durationDays));

        //Configure request object, which provides information of the item
        JsonObject request = new JsonObject();
        request.addProperty("userId", userId);

        JsonObject payload = token.getPayloadAsJsonObject();
        payload.add("info", request);

        try {
            return token.serializeAndSign();
        } catch (SignatureException e) {
            throw new RuntimeException(e);
        }
    }

    /**
     * Verifies a json web token's validity and extracts the user id and other information from it. 
     * @param token
     * @return
     * @throws SignatureException
     * @throws InvalidKeyException
     */
    public static TokenInfo verifyToken(String token)  
    {
        try {
            final Verifier hmacVerifier = new HmacSHA256Verifier(SIGNING_KEY.getBytes());

            VerifierProvider hmacLocator = new VerifierProvider() {

                @Override
                public List<Verifier> findVerifier(String id, String key){
                    return Lists.newArrayList(hmacVerifier);
                }
            };
            VerifierProviders locators = new VerifierProviders();
            locators.setVerifierProvider(SignatureAlgorithm.HS256, hmacLocator);
            net.oauth.jsontoken.Checker checker = new net.oauth.jsontoken.Checker(){

                @Override
                public void check(JsonObject payload) throws SignatureException {
                    // don't throw - allow anything
                }

            };
            //Ignore Audience does not mean that the Signature is ignored
            JsonTokenParser parser = new JsonTokenParser(locators,
                    checker);
            JsonToken jt;
            try {
                jt = parser.verifyAndDeserialize(token);
            } catch (SignatureException e) {
                throw new RuntimeException(e);
            }
            JsonObject payload = jt.getPayloadAsJsonObject();
            TokenInfo t = new TokenInfo();
            String issuer = payload.getAsJsonPrimitive("iss").getAsString();
            String userIdString =  payload.getAsJsonObject("info").getAsJsonPrimitive("userId").getAsString();
            if (issuer.equals(ISSUER) && !StringUtils.isBlank(userIdString))
            {
                t.setUserId(new ObjectId(userIdString));
                t.setIssued(new DateTime(payload.getAsJsonPrimitive("iat").getAsLong()));
                t.setExpires(new DateTime(payload.getAsJsonPrimitive("exp").getAsLong()));
                return t;
            }
            else
            {
                return null;
            }
        } catch (InvalidKeyException e1) {
            throw new RuntimeException(e1);
        }
    }


}

public class TokenInfo {
    private ObjectId userId;
    private DateTime issued;
    private DateTime expires;
    public ObjectId getUserId() {
        return userId;
    }
    public void setUserId(ObjectId userId) {
        this.userId = userId;
    }
    public DateTime getIssued() {
        return issued;
    }
    public void setIssued(DateTime issued) {
        this.issued = issued;
    }
    public DateTime getExpires() {
        return expires;
    }
    public void setExpires(DateTime expires) {
        this.expires = expires;
    }
}

Happy API secure using JWT with Vinay

Reference
– https://github.com/jwtk/jjwt
– http://connect2id.com/products/nimbus-jose-jwt
– https://code.google.com/archive/p/jsontoken/

Tutorial for Oracle Webcenter 11g RCU utility And weblogic installation

Requirement -provide detailed step-by-step procedure for preparing your system for the installation of Oracle WebCenter 11g and Oracle UCM 11g on 64-bit Linux environment.


  1. Pre-requisites for Oracle WebCenter 11g and Oracle UCM 11g Installation

Check the following pre-requisites on your system where WebCenter and UCM installation need to be done –

  1. Before starting the installation, the software bundles of the following products need to be available.


#

Product Name

Version (As used in the project)

1

Oracle Database

11g Release 1 or 2

2

Repository Creation Utility (RCU)

11.1.1.4

3

JDK

1.6.0_26

4

Oracle WebLogic Server

11g Release 1(10.3.5.0)

5

Oracle WebCenter Server

11g Release 1 (11.1.1.4.0)

6

Oracle UCM Server

11g Release 1 (11.1.1.4.0)


  1. Creating WebCenter and UCM Group/User for installation


  1. Log in as the ‘root’ user.
  2. Create a Group (each for WebCenter and UCM installations) and an User (each for WebCenter and UCM installations). Assign the appropriate User to the respective Groups for the WebCenter and UCM installations.


  3. Checking Kernel Parameters


The following are the steps that needs to be followed –

  1. Log in as the ‘root’ user.
  2. Add the lines below to /etc/security/limits.conf file:


<User> soft nofile 4096

<User> hard nofile 4096

Here, Replace <User> in the above mentioned lines with the WebCenter or UCM installation user.

  1. Restart the system.


  2. Checking /tmp Space


The following are the steps that needs to be followed –

  1. Log in as the ‘WebCenter or UCM installation’ user.
  2. Make sure /tmp directory is writable and has atleast 60 MB of disk space for WebCenter and UCM installation.
  3. Run ‘df –h’ and verify of value of /tmp >=60 MB


  1. Preparing your system for WebCenter and UCM installation


You need to install the following products on your system before you run the WebCenter and UCM installation –

  • Repository Creation Utility (RCU) Schema Creation
  • JDK Installation
  • Oracle WebLogic Server Installation                                                

The following sub-sections elaborate the installation details for each of the above steps.

  1. Repository Creation Utility (RCU) Schema Creation

WebCenter Portal and UCM require that certain schemas exist in the database prior to installation. You must run Repository Creation Utility (RCU) to create the schemas in the database.

The following pre-requisites need to be done on your system before you run the RCU for creating schemas –

  • You must create an Oracle Database Instance (11g Release 1 or 2).
  • All the below required DB parameters need to be updated and these are only specific to RCU. Execute the below given SQL query using TOAD Editor/SQL Plus before you run the RCU installation.


alter system set open_cursors=500 scope=spfile

alter system set processes=500 scope=spfile

alter system set sessions=500 scope=spfile


This section elaborates the step-by-step procedure to create schemas in the database –

Step 1:

  • Unzip the RCU installable file to a directory (Say, rcuHome).
  • Navigate to /rcuHome/bin directory and open a terminal window.
  • Enter the following command:


    ./rcu

  • The RCU Welcome Screen appears.
  • Click Next to continue.


Step 2:

  • Select ‘Create’ to create component schemas in the database.
  • Click Next to continue.


Step 3:

  • Provide the Database Connection Details (as given during the creation of Oracle Database):


  • Click Next to continue.


Step 4:

  • The Checking Prerequisites Screen appears, indicating the progress of the installer establishing the connection with the specified database.
  • When the operation completes, click OK.


Step 5:

  • Specify a schema prefix and select the components for which you want to create schemas in the database.
  • The default new prefix is ‘DEV’. If you want to create a new prefix for your schemas, select ‘Create a New Prefix’ and specify a new prefix name in the field. (E.g. S).
  • Select the following components (marked in bold). The components are selected here as per the project requirement.


Components  

Schema Owner

Dependencies

As Common Schemas


-Metadata Services

S_MDS         

None

Enterprise Content Management


-Oracle Content Server 11g-Complete

S_OCS   

None

WebCenter Suite


-WebCenter Spaces

S_WEBCENTER

None

-Portlet Producers

S_PORTLET

None

-Activity Graph and Analytics        

S_ACTIVITIES

None

Portal and BI          


-Portal

S_PORTAL

Oracle Portlet Producers (prefix_PORTLET)


  • After you select the components you want to install, click Next to continue.


Step 6:

  • The Checking Prerequisites Screen appears, indicating the progress of the component pre-requisites check for creating schemas.
  • When the operation completes, click OK.


Step 7:

  • Specify the passwords for your schema owners.
  • Select ‘Use same passwords for all schemas’ to use a single password for all schemas and their auxiliary schemas. This option is selected by default.
  • Enter the password and confirm password again.
  • Click Next to continue.


Step 8:

  • The Custom Variables Screen appears only if you selected a component on the Select Components Screen (for Create Operation) that supports custom variables, required by the components during runtime.
  • Enter value as ‘Y‘.
  • Click Next to continue.


Step 9:

  • The Map Tablespaces Screen appears.
  • In this installation, you accept the default and temporary tablespaces for the selected components.
  • Click Next to continue.


Step 10:

  • The Creating Tablespaces Screen appears, indicating the progress of the tablespaces creation.
  • When the operation completes, click OK.


Step 11:

  • Review the Summary Screen and verify the details of component schemas that will be created in the database.
  • Click Create to begin schema creation.


  • The schemas are being created.


Step 12:

  • The Completion Summary Screen appears, indicating the successful creation of schemas for Oracle WebCenter 11g and Oracle UCM 11g.
  • Click Close to exit.


  1. JDK Installation

The JDK must be installed on your system before you install Oracle WebLogic Server. It is recommended that you use the Sun JDK if you are installing in a development environment. Typically, this environment provides a more relaxed security configuration and enables you to auto-deploy applications. In a development environment, boot.properties is used for user names and passwords and polling is used for application deployment.

If you are installing in a production environment, it is recommended that you use the Oracle JRockit JDK. Production environments are for applications running in their final form. Full security is enabled and applications may be clustered or use other advanced features. In this mode, user names and passwords are required and polling is not used for application deployment.

This section elaborates the step-by-step procedure to install Sun JDK –

Step 1:

  • Navigate to the directory where you want to install the software. (Say, /usr/local/apps). In this installation, Sun JDK installable file is placed at the same location where you want to install the software.


  • Change the permission of the file you downloaded to be executable. Open a terminal window and enter the following command:


chmod a+x jdk-6u26-linux-x64.bin

  • Verify that you have permission to execute the file. Enter the following command:


    ls –l


Step 2:

  • Run the JDK executable file. Enter the following command:


    ./jdk-6u26-linux-x64.bin


Step 3:

  • You will be prompted to ‘Press Enter to continue’. Press ‘Enter’ to complete the installation. In this installation, Sun JDK is installed in the /usr/local/apps/jdk1.6.0_26 directory.


  1. Oracle WebLogic Server Installation

WebCenter and UCM runs on Oracle WebLogic Server 11g. You must install Oracle WebLogic Server before you install WebCenter and UCM. If you do not already have one, follow the instructions in this section to install Oracle WebLogic Server.

General Note to the Administrators:-

The Installation window prompts you to enter the number associated with the choice or by pressing Enter to accept the default. Following are the choices:

  1. Exit – to exit from the installation procedure in response to any prompt.
  2. Previous – to review or change the selection.
  3. Next – to proceed.


When you see a right arrow (->) associated to a choice on the screen during the installation process, it depicts that the corresponding choice is selected by default by the installer. Type Next and press Enter to accept the default selection (or) enter the number associated with the choice for selecting the option of your choice.

When you see a cross symbol (x) associated to a choice on the screen during the installation process, it depicts that the corresponding choice is selected by default by the installer. Type Next and press Enter to accept the default selection (or) type the number that appears inside the [ ] brackets and press Enter to deselect the default selection (or) enter the number associated with the choice for selecting the option of your choice.

Step 1:

  • Navigate to the directory where the WebLogic installable file is placed. (Say, /usr/local/apps/wcdownloads)


  • Open a terminal window and set the JAVA_HOME environment variable on your system. Enter the following command:


    JAVA_HOME=/usr/local/apps/jdk1.6.0_26; export JAVA_HOME

    Here, JAVA_HOME is the installation location of the supported JDK you installed for your platform.

  • Run the WebLogic executable file. Enter the following command:


    java –Xmx1024m –jar wls1035_generic.jar –mode=console


  • The wls1035_generic.jar file is extracted and the installation process begins.


Step 2:

  • At the Welcome prompt, type Next, or press Enter to continue with the installation process.


Step 3:

  • The Choose Middleware Home Directory prompt is displayed.
  • Specify the desired location of your new Middleware Home directory.
  • Type the new Middleware Home. Say, ‘/usr/local/apps/Oracle/Middleware’ and press Enter to continue.


Step 4:

  • The chosen Middleware Home directory is displayed. Type Next and press Enter to continue.


Step 5:

  • The Register for Security Updates prompt is displayed.
  • Select whether or not you want to receive the latest product and security updates.
  • If you do not wish to receive security updates and to initiate configuration manager, type 3 and press Enter to continue.


Step 6:

  • Type No and press Enter to confirm your selection.


Step 7:

  • If you choose not to receive anything, you will be asked to verify your selection before continuing.
  • Type Yes and press Enter to confirm your selection.


Step 8:

  • Type Next and press Enter to proceed with the installation process.


Step 9:

  • The Choose Install Type prompt is displayed.
  • The Typical installation type is selected by default. In this installation, you must select the Custom installation type to select the products and components you want to install.
  • Type 2 and press Enter to continue.


Step 10:

  • The Choose Products and Components prompt is displayed.


  • The following table shows the products and its components that are selected by default by the installer (as shown in the screenshot below) –


Products

Components

WebLogic Server

Core Application Server


Administration Console


Configuration Wizard and Upgrade Framework


Web 2.0 HTTP Pub-Sub Server


WebLogic SCA


WebLogic JDBC Drivers


Third Party JDBC Drivers


WebLogic Server Clients


WebLogic Web Server Plugins


UDDI and Xquery Support


Evaluation Database

Oracle Coherence

Coherence Product Files


Coherence Examples


  • You will be prompted to select the products and the components from the list that you want to install as shown in the screenshot below. Type the number exactly as it appears in brackets adjacent to the products and the components.


  • In this installation (as per the project requirement), de-select Evaluation Database component (that belongs to the WebLogic Server Product) and de-select Oracle Coherence product and its components.


  • The de-selection of the products and the components for this installation is illustrated in the below steps with necessary screenshots.


Step 11:

  • Type 1.12 and press Enter to de-select the Evaluation Database component.


Step 12:

  • Type 2 and press Enter to de-select the Oracle Coherence product and its components.


Step 13:

  • After you select the products and the components you want to install, type Next and press Enter to continue.


Note:

The following table shows the products and its components selected for this installation (as per the project requirement) –

Products

Components

WebLogic Server

Core Application Server


Administration Console


Configuration Wizard and Upgrade Framework


Web 2.0 HTTP Pub-Sub Server


WebLogic SCA


WebLogic JDBC Drivers


Third Party JDBC Drivers


WebLogic Server Clients


WebLogic Web Server Plugins


UDDI and Xquery Support


Step 14:

  • The JDK Selection prompt is displayed.
  • Select the JDKs you want to install.
  • Type 1 and press Enter to add the local JDK (SUN JDK 1.6.0) that you installed on your system.


Note:

If you notice to see open JDK (/usr/lib/jvm/java-1.6.0-openjdk-1.6.0.0.x86_64) is selected by default by the installer on this screen (as shown in the screenshot below). You must de-select the open JDK once the process of adding local JDK is done to proceed with the installation process.

It is recommended that you use the Sun JDK if you are installing in a development environment and if you are installing in a production environment, it is recommended that you use the Oracle JRockit JDK.

The 32-bit WebLogic executable files are bundled with the appropriate JDK version. If you use the 64-bit WebLogic installer, you will need to invoke the installer with a supported JDK for your platform.


Step 15:

  • Type the new Local Java Home. Say ‘/usr/local/apps/jdk1.6.0_26’ and press Enter to continue.


Note:
JAVA_HOME is the installation location of the supported JDK you installed for your platform.


Step 16:

  • Type Next and press Enter to confirm your selection.


Step 17:

  • The chosen Local JDK is displayed.


  • The open JDK is selected by default by the installer as shown in the screenshot below. You must de-select the open JDK to proceed with the installation process.


  • Type 2 and press Enter to de-select the open JDK selection.


Step 18:

  • The open JDK is de-selected as shown in the screenshot below.


  • Type Next and press Enter to continue.


Step 19:

  • The Choose Product Installation Directories prompt is displayed.


  • The chosen Middleware Home directory is displayed as shown in the screenshot below.


  • Type Next and press Enter to continue.


Step 20:

  • Review and verify the list of products and the components that will be installed.


  • Type Next and press Enter to continue.


Step 21:

  • The installation process begins. Progress bar shows the % installation of the component.


  • Once the installation is complete the following message is displayed, ‘Congratulations! Installation is complete’.


  • Type Exit and press Enter to exit the installation process.


References

  • Oracle Fusion Middleware Repository Creation Utility User’s Guide 11g Release 1 (11.1.1)